In this final post of my three-part series on Turning a Flowerbed into a Vegetable Garden, I will cover a few different methods of planting, give some brief information about gardening by the moon and show you my plan for planting my raised beds using the companion planting method. When I finished writing the first post in this series, I never dreamed it would end up being a three-part series, but it blossomed, and I realized halfway through the second post that I was going to have to cover the planting and gardening by the moon information in a third post.
Growing up on the farm in Oregon, we used the row method for gardening. When I married and moved to a tiny lot, I invested in the book “Square Foot Gardening: A New Way to Garden in Less Space with Less Work” by Mel Bartholomew because we had no room for a conventional row garden. This method utilizes a 4 x 4 garden bed set in a grid pattern of 1 x 1 foot squares. Mr. Bartholomew has pre-determined how much space each plant needs for optimal growth and gives the reader a nice little plan for each square. It’s a good method, but not the best because it does not give the gardener optimal yield per square inch of space. This is what I am in need of because I have limited garden space. I found the intensive method in the book “Mini Farming: Self-Sufficiency on 1/4 Acre
” by Brett Markham which takes the spacing information for each individual seed and instructs the gardener how to completely fill up the space given. For example, if the gardener wants to plant carrots and the spacing for carrots is ½ inch the gardener can plant seeds one ½ inch in every direction until the desired area is completely full of seeds. This is the method I chose to use in my garden this year because of the optimum yield and because close planting helps cut down on weeds.
Several years ago I was introduced to gardening by the moon. I don’t remember exactly how or where, but the theory makes sense to me, and I use it as much as possible, weather permitting. Just like the tide is affected by the pull of the moon, it is believed that the liquid in plants and the soil is also affected by the moon. The basic idea is that root plants are planted in the dark of the moon and above ground plants are planted during the light of the moon. I have done it once before and am trying it again because I need optimal yield from my garden. Unfortunately, I don’t remember what the results were the first time I tried it. Ed Hume puts out an inexpensive, little booklet that includes everything you need to utilize this method, including when to plant, cultivate, compost, water, mow and more.
So according to this little booklet, I needed to plant beans, cucumbers and squash on May 23th or 24th. I also decided to plant sunflowers during this time, which were not listed in booklet. A few days before the plant date, I planned out my beds by using some great information from the book Great Garden Companions: A Companion-Planting System for a Beautiful, Chemical-Free Vegetable Garden by Sally Jean Cunningham, which I had purchased several years ago when I was searching for a natural, organic method of gardening.
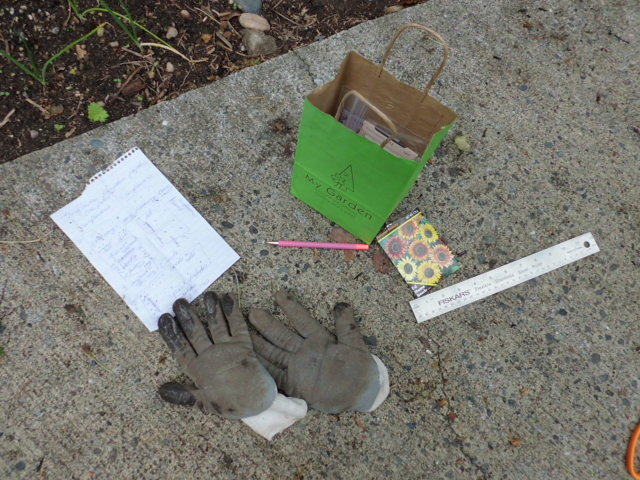
Here’s a picture of the items I used to plant my beds.
On the left is the plan for each box, at the top is a cute little bag with the organic seeds from my local garden store, in the center is a pen with lines on it to help me plan the depth of the planting holes, on the right is the ruler I used for seed spacing and my trusty garden gloves are in the center bottom. The one thing that is missing in this picture is a Sharpie that I used to write on the boards.
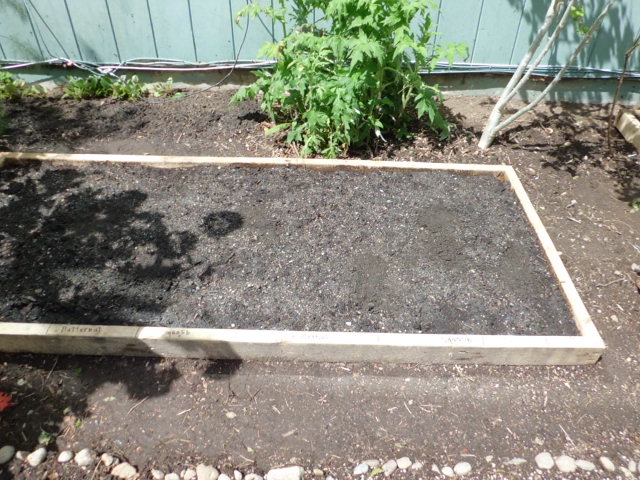
First I planted sunflowers in the tiny hill next to the house to the left of the globe thistle (the green plant towards the middle). In front of those, I planted some peas. I also did an intensive planting of peas from the center of the globe thistle to the left edge of the frame in the bed. In front of the peas and all the way to the right edge of the raised bed, I staggered five or six hills of butternut squash. Then I wrote on the tops of the 2 x 4s with the names of the seeds in the appropriate places which you can see in the bottom left of the above picture.
In the center bed, I planted sunflowers at the top of the frame next to the house and then planted Scarlet Runner Beans in front of the sunflowers. I wrote on the boards, which you can slightly see on the right. In front of the beans, I planted dill and then cucumbers down both sides of the boards towards the sidewalk. When the cucumbers get tall enough, I will place chicken wire on the insides of the plants to create a hoop for the cucumbers to climb over. The inside of this hooped section will be a perfect shaded spot for cool weather greens in the heat of the summer. This idea came from the book Great Garden Companions, and I can’t wait to see if it works.
In the last large bed, I continued planting sunflowers and beans along the house, but I planted Blue Lake Pole Beans in front of the sunflowers and some dill in front of the beans. Then I continued the sunflower/bean planting along the right side of this bed to the front edge. The last thing I planted in this bed were two hills of zucchini which you can see in the picture above. Again, I wrote on the top of the frame of the bed to mark where I planted the seeds and the name of the seeds. The smaller frame on the front right side of the bed will be planted with root seeds during the dark of the moon later this month, and I will plant radishes at the same time throughout the squash plants to help deter squash bugs. Last, but not least, I covered each bed with bird netting to keep out birds and cats. When the plants start growing, my husband will fasten brackets to the sides of each bed and put PVC in each bracket to make hoops so the bird netting will float above the plants.
Well that’s it! I hope you enjoyed this series and pray you learned something. I plan to post pictures in the future to update the garden’s progress. Happy gardening and God bless your efforts!
Shared on:
Homestead Barn Hop, Simple Lives Thursday


